Sunday, May 30, 2010

Day Twenty-Four: Arroz Con Pollo


Day 24 of Operation: Expand Horizons is another recipe by America's Test Kitchen, Latino Style Chicken and Rice, aka Arroz Con Pollo (registration required).

I've eaten Arroz Con Pollo before, as prepared by my amiga puertorriqueña Becky, but I've never cooked it myself. This version is simple, if a little time-consuming. My husband thought it lacked a certain something (maybe spiciness?). However, it was good, and certainly deserved a try.

Thursday, May 27, 2010

Day Twenty-Three: Coconut-Pineapple Loaf Cake


Day 23 of Operation: Expand Horizons brings a tasty dessert- Coconut-Pineapple Loaf Cake from the June 2008 issue of Everyday Food.

This simple dessert comes together quickly and tastes fantastic. I've always loved the combination of coconut and pineapple, and this cake is just right. I would make one small change next time. The recipe calls for toasting all of the coconut, a portion of which is scattered on top of the batter before baking. Because it was already toasted, some of the topping coconut got a bit over-browned for my tastes. Next time, I'll toast the coconut that goes into the batter but leave the topping as is, allowing it to toast while the cake bakes.

This cake is quite tasty the next day as breakfast! :D

Tuesday, May 25, 2010

Temporary hiatus- not to worry!

Operation: Expand Horizons is on hiatus for a few days. My husband and I have both been feeling kinda crappy lately and haven't been in the mood for any new recipes. In fact, I'm lobbying for takeout tonight because I am SO not up for cooking.

Nevertheless, the cooking and photography and blogging will continue soon, pinkie swear!

Sunday, May 23, 2010

Day Twenty-Two: Three Cheese Beer Bread

Day 22 of Operation: Expand Horizons brings a recipe from the food blog Brown Eyed Baker. I'm not sure where she got the idea for Three Cheese Beer Bread, but it was inspired!

This tasty carb-load falls into the category of quick breads, which are risen without the use of regular yeast. This particular bread gets its bubbles from baking powder and 16 ounces of beer. I used a tall can of Coors Light, which was 16 ounces exactly, and just the kind of crisp lager taste that would match well with bread and cheese.

My careful planning left me with not the quite amounts of the required cheeses, so I took small liberties with the types and quantities- adding a little Swiss where I lacked some Gruyère, and a little Butterkäse (a mild, buttery, semi-soft cheese from Germany or Austria) and mozzarella where I lacked some white cheddar.

I took a loaf of this bread to a cookout and it was well received, despite a glaring omission during the mixing of the dough. I made the mistake of talking on the phone for an hour to my darling friend Allison from Eat Well Love Life while I was in the kitchen and accidentally left out the tablespoon of Worcestershire sauce. D'oh!

Nevertheless, the bread was delicious, and next time, I'm sure it will be even better. Thanks to Brown Eyed Baker for her blog and this great recipe. I have a few more of her recipes to recreate over the rest of this Operation.

Day Twenty-One: Multigrain Bread


Day 21 of Operation: Expand Horizons was a baking day. Multigrain Bread from America's Test Kitchen (sign-up required, but the recipe is free for now) was, as promised, easy and pretty good. It toasts nicely and has a good hearty texture and flavor.

My one complaint about this bread is that it was a bit crumbly. Half-inch slices for a sandwich did not hold up well. A bit of internet research indicates that maybe I somehow used too much flour. Perhaps I need more practice with breadmaking!

I used Bob's Red Mill 7-grain hot cereal mix, as indicated in the recipe. I bought salted sunflower nuts instead of unsalted as the recipe calls for. If they were unsalted, I would wind up with a whole bag that none of us would eat, so I reduced the recipe's salt by about half. It seems a worthwhile compromise.

Thursday, May 20, 2010

Day Twenty: Chicken Salad Sandwich


Day twenty of Operation: Expand Horizons was an original mash-up recipe using leftover green chile mayo from the burgers and fries posting a couple of days ago.

I poached a medium-sized chicken breast in water seasoned with some kosher salt, black pepper, dried parsley, and dried chives. Poaching, if you're unfamiliar, is gentle simmering in water and seasonings, usually herbs or other aromatics like onion and garlic. It infuses flavor without causing the tough texture usually imparted by boiling the meat.

I removed the chicken from the cooking water and let it cool briefly before chopping. I also chopped up 1/4 of a Gala apple and two green onions. I mixed the chicken, apple, onion, and a large pinch of slivered blanched almonds with the remaining green chile mayo, seasoned it with salt and pepper, and piled it onto some homemade multi-grain bread with a piece of romaine lettuce.


Delicious!

Day Nineteen: Quick Lemon Mousse


Day nineteen of Operation: Expand Horizons brings a fast and easy dessert from Martha's minions- Quick Lemon Mousse from the May 2010 issue of Everyday Food.

This citrusy, creamy concoction is made up of no more than gelatin, sugar, lemon juice, water, and heavy cream, and is chilled briefly before being served with some berries to balance the tanginess. I would love to have used the blackberries called for in the recipe, but again, my budget dictates my ingredients, and blackberries are about $5.00 for a half pint. No thanks! I had some good (and inexpensive) strawberries, and they were an excellent substitute.

The recipe states it serves 4, but it could have easily served 6 instead, especially when you have plenty of fruit to pair with. The generous portions were a little too much, and the lemony flavor can be a little overwhelming if you eat the whole bowl. Nevertheless, this super fast and elegant dessert is a must for the repertoire of sweets.

Day Eighteen: Spring Vegetable Couscous and Steak Kebabs


Day eighteen of Operation: Expand Horizons offers one new recipe from the May 2010 issue of Martha Stewart's Everyday Food, Spring Vegetable Couscous, as a side dish to some tried-and-true steak kebabs.

I've never tried couscous before, and it was super quick to prepare. The dish itself is simple- asparagus, green onion, frozen peas, parsley, couscous, and water. I really liked it, but my husband, who is season-weary of asparagus, complained about it and also said it had too many peas. I think I might make a variation of this dish as a cold salad, using tabouli wheat (bulgur) instead of couscous. I may even spring it up further by adding some shredded spinach!

The magazine version calls for lemon zest and fresh lemon juice. Knowing our tastes (asparagus may well pair with lemon according to traditional cooking lore, but I find it has too much bitterness), I omitted the lemon and added two small cloves of garlic. The magazine also calls for adding shredded rotisserie chicken to make this a main dish, but that sounded weird to me and I opted instead to make it as a meatless side.


I like to keep frozen peas in the fridge at all times. For one, I got lucky with a youngin who will literally eat peas as a snack. Secondly, the frozen variety are infinitely more tasty than the canned variety. I learned my lesson buying the cheap store brand frozen veggies. There is a noticeable difference in flavor and texture- I now buy either Green Giant or Birds Eye exclusively.

Here's the recipe as it appears in this month's Everyday Food, with my changes noted in italics. I halved the recipe to make it a side for two adults and a 3 year old, and had about a serving left over.

Spring-Vegetable Couscous with Chicken
Serves 4

3 tbsp. unsalted butter
4 scallions, white and green parts separated and thinly sliced crosswise
2 wide strips lemon zest plus 1 tbsp. lemon juice (I omitted in favor of 2 cloves garlic, minced)
coarse salt and ground pepper
1 lb. asparagus, trimmed and cut into 1/2" pieces
1/2 c. frozen peas
1 cup couscous
leg and thigh meat from 1 rotisserie chicken, turn into bite-size pieces (I omitted.)
2 tbsp. chopped fresh parsley

Melt butter in a medium saucepan over medium-high. Add scallion whites (and garlic) and cook, stirring constantly, until softened, about 3 minutes. Add lemon zest and 1 1/4 cups water and season with salt and pepper. Cover pan and bring liquid to a boil, then add asparagus and peas. Return to a boil and stir in couscous. Add chicken and remove pan from heat; cover and let sit 7 minutes. Add lemon juice (I omitted), scallion greens, and parsley and season with salt and pepper. Fluff with a fork and serve.


I have a well-worn recipe my husband found online for a dry rub for steak. It's purported to be like that used by Outback Steakhouse, but whether that's true or not, it's a good mix.

Steak Rub
Makes about 1/2 cup. Mix the following in a small bowl. Sprinkle generously over steak or pork chops about 1/2 hour before grilling. Store leftovers in a sealed container with your spices.

4 tsp. kosher salt
4 tsp. paprika
2 tsp. ground black pepper
1 tsp. onion powder
1 tsp. garlic powder (I use garlic granules, which I think have a more potent flavor.)
1/2 tsp. cayenne powder
1/2 tsp. ground coriander
1/2 tsp. ground turmeric

Monday, May 17, 2010

Day Seventeen: Burgers and Fries


Day seventeen of Operation: Expand Horizons is a new interpretation on a family fave, burger night. Everyday Food offers up an Emeril Lagasse recipe for Pork and Chorizo Burgers with Green Chile Mayo. I also tried a new method of makinghomemade fries with a technique offered up by America's Test Kitchen.

Keep in mind that the fry recipe is available now for free from ATK, but you must have a login for their website and it won't be free forever!

While the pork and chorizo burgers weren't all that great, the green chile mayo was fantastic. It's a simple combination of roasted poblano pepper, mayonnaise, garlic, and lime juice, thrown together in the blender. I'll definitely make it again. In fact, it would be a good base for a chicken salad sandwich!

The fries were awesome as well. I think I cut them a little bit big, but they still turned out crispy and cooked all the way through without being overly greasy. Another thing to remember: the fry recipe is for Yukon Gold potatoes, not Russet! Yukon Golds have a firmer texture than Russets, and hold their shape better.

There are 3 cutting steps for evenly sized fries: squaring off the potato sides, cutting them into 1/4" planks, cutting the planks into 1/4" batons.


Finished fries. A wire spider is the key to fishing hot fries out of hot oil with a minimum of clinging oil. It's also a useful tool for cooking tempura in a wok.


Day Sixteen: Breaded Pork Chops and Wild Rice with Mushrooms


Day sixteen of Operation: Expand Horizons seemed like it would be a very picky-husband-friendly meal. It wasn't his favorite, but he didn't hate it. The March 2010 issue of Martha Stewart's Everyday Food brought both new recipes for this dinner- Breaded Pork Chops and Wild Rice with Mushrooms and Parsley.
The pork recipe makes 8 chops and is actually a freezer batch. I made 3 chops and skipped the freezing. I don't know if this made a difference, but the crust didn't seem to adhere well to the chops. The recipe indicates that any other herb can be substituted for the fresh sage. I never have sage, but I have thyme in a pot on my back patio, so that's what I used. It usually matches well with Dijon mustard, and this was no exception. The chops were a little too mustardy for our tastes. They also took longer to cook than the recipe indicates, but I also don't broil meat on the top rack for fear of burning the outside and having a raw middle.

The mushrooms and wild rice was a good basic side that I will make again. It's a simple mixture of cooked wild rice blend, sautéed mushrooms, garlic, and fresh parsley. The recipe called for some fresh lemon juice at the end, but I didn't think it needed any so I omitted it.

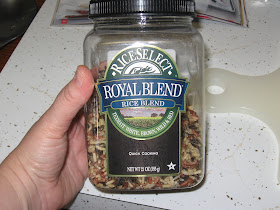
I have a trusty container of Rice Select rice blend that I use frequently. It contains white, brown, wild, and red rices, and has a mild, nutty flavor that I really enjoy.

The EDF recipe calls for making the rice according to package directions. I find that packages vary, and Martha's people often use less water than I do. My way of making rice is very simple and no-fail.

In a straight-sided sauce or sauté pan, combine 1 part rice with two parts water, a drizzle of olive oil, a good sprinkling of kosher salt, and a few grinds of black pepper. Cover and bring to a simmer over medium heat. Cook without stirring until the top of the rice is no longer submerged and there are holes throughout the surface. Remove from the heat and let it stand for 5-10 minutes before fluffing with a fork and seasoning to taste.

You can also make a simple pilaf by heating some olive oil in the pan and sauteing some chopped onion and minced garlic before adding the rice, water, and a bouillon cube for extra flavor.


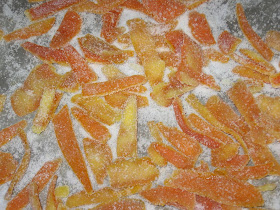
Candied Orange Peels


When life gives you lemons, or oranges, limes, or grapefruits, save the peels and turn them into a tasty, chewy candy.

With a sharp paring knife, remove the outermost layer of the citrus peel(I used 5 large oranges), avoiding the white pith. Cut into 1/4" strips. Boil in water for about 10 minutes. Strain out with a slotted spoon and let dry on a baking rack for about 15 minutes. Rinse out the pan you boiled the peels in and add a fresh cup of water and a cup of white sugar. Bring to a boil, add the peels, and boil for another 8-10 minutes until the peels start to turn translucent. Return the peels to the baking rack and allow to dry for 1 hour. Coat liberally with more white sugar. Peels will keep unrefrigerated in a plastic bag or container for 2-3 weeks.

Sunday, May 16, 2010

Day Fourteen: German Chocolate Cake


Day fourteen of Operation: Expand Horizons was a bit of a cheat. We had dinner plans at a restaurant to celebrate my brother's Master's degree completion, so I wasn't going to be cooking. Additionally, I was tapped to provide a cake. When my bro requested German chocolate, I decided to try a version from America's Test Kitchen that I had not used yet.

ATK hasn't failed me yet with their über-tested recipes, and this cake was no exception. It was delicious! The recipe says it serves 12-16, but I cut thin slices of this 4-layer monster for about 15 people and had cake left to spare.

Normally, German chocolate cake only has frosting between the layers. The outside chocolate frosting is my addition to pretty it up for a party. The "Perfectly Chocolate" frosting on the side of a box of Hershey's cocoa is a great basic recipe, and it's what I used. I added additional powdered sugar to make it stiff enough for piping.

German Chocolate Cake with Coconut-Pecan Frosting
Adapted from America's Test Kitchen
Serves 12-16

FILLING:

1 ½ cups pecan halves, toasted in a 350º oven and cooled

4 egg yolks

1 – 12 oz. can evaporated milk

6 Tbsp. unsalted butter, cubed

¼ cup light brown sugar, packed

1 cup sugar

1/8 tsp. table salt

2 tsp. vanilla extract

2 1/3 cups sweetened shredded coconut

Whisk egg yolks and evaporated milk together in a medium saucepan. Add butter, sugars, and salt. Cook over medium heat, whisking constantly, until bubbling and foaming. Pour into a bowl and add vanilla and coconut. Let cool to room temperature, cover bowl with plastic wrap, and refrigerate until cool and thickened. When ready to fill the cake, chop the toasted pecan halves and fold into cooled filling.

CAKE:

4 oz. bittersweet chocolate, chopped

¼ cup cocoa powder

½ cup boiling water

4 eggs

2 cups all purpose flour

¾ tsp. baking soda

1 ½ sticks unsalted butter

1 cup sugar

2/3 cup light brown sugar, packed

¾ tsp. table salt

1 tsp. vanilla extract

¾ cup sour cream

Preheat oven to 350º. Spray two 8” round cake pans with nonstick spray. Line bottoms with parchment paper and spray again. Coat the bottoms and sides of pans with flour, tapping out excess.

Combine chopped chocolate and cocoa powder in a small bowl. Pour boiling water over the mixture, cover with plastic wrap, and let sit for 5 minutes.

Whisk together flour and baking soda.

In a stand mixer, beat butter, sugars, and salt for about 4 minutes until creamy. Add eggs one at a time, scraping down mixer bowl and blade in between. Add vanilla. Whisk chocolate mixture and add to creamed mixture. Blend well.

With mixer on medium-low, alternately add flour mixture and sour cream. Don’t overbeat. Finish incorporating by hand. The batter will be very thick. Divide evenly between the two prepared pans and smooth the tops with an offset spatula.

Bake in 350º oven on the center rack for about 30 minutes, rotating the pans halfway through. Cool cakes in pans for about 5 minutes. Invert cakes onto cooling racks that have been sprayed with nonstick spray, peel off parchment paper, and allow to cool about 1 hour.

Split layers in half horizontally and spread about 1 cup of filling between each layer and on top.


Leftover Chocolate Cake Trifle


Baking my cousin's groom's cake left me with an extra 9" square of chocolate stout cake, but no frosting. On a whim, I decided to turn the cake into an easy dessert.

I used about 3/4 of the cake and cut it into 1" cubes, and whipped and sweetened some heavy cream. If you've never made homemade whipped cream, WHY THE HELL NOT? It's super easy and much tastier than the frozen artificial crap in the tub, or the greasy stuff in the aerosol can.

Chill a small glass bowl and the beaters from an electric mixer in the freezer for about ten minutes. When they're icy cold, deposit about half a cup of heavy cream, a tablespoon or so of sugar, and a half teaspoon of vanilla extract into the bowl, attach the beaters, and beat the ever lovin' tar out of it. Taste it halfway through and adjust sugar if needed. You don't want to add sugar after it's fully whipped, or the sugar won't dissolve. When you can hold the bowl sideways or even upside down without spilling, it's done.


Once I had my sweet whipped cream and cake cubes, I put a layer of cake pieces on the bottom of a small round casserole. I drizzled some cold leftover coffee over the cake, spread on a layer of whipped cream, generously drizzled on some Hershey's chocolate syrup, and repeated with a second layer of cake, coffee, whipped cream, and syrup.

I chilled the whole mess for about 20 minutes before scooping some out into bowls. Delicious!

Day Thirteen: Fettuccine with Peas, Asparagus, and Pancetta


Day thirteen of Operation: Expand Horizons was a simple pasta dish from Bon Appétit's May 2010 issue, Fettuccine with Peas, Asparagus, and Pancetta.

The dish is quite simple and fast. The prep time is actually longer than the cooking time.

We were a little disappointed with the bland flavor overall and the overwhelming amount of lemon, but it was worth a shot. The combo of pasta water, cream, olive oil, lemon juice, and Parmesan is worthy of using again as a light pasta sauce base, with a smaller amount of lemon.

The recipe says it serves 4, but quantities listed told me that I'd have too much left over if I didn't trim it down. Instead of 1 1/4 pounds of asparagus, I used about 3/4 pound. Instead of two cups of peas, I used one cup. Instead of a whole bunch of scallions (we call them "green onions" here in Oklahoma), I used 4. There was still a very generous amount of veggies in the recipe, and it seems like the called-for amounts might have been too much anyway.

Pancetta is outside of my budget, so I used regular bacon, which is an acceptable substitute per the recipe. We are a bacon-loving household, and Wright brand thick-cut bacon is fantastic. The recipe calls for 2 ounces of bacon, but because of my die-hard carnivore spouse, I used more- 3 slices, or about 3 ounces.

The bacon is merely a garnish, so of course my husband whined about the lack of a hunk of meat at dinner. He'll get over it.

I made some garlic toast for a side out of that delicious homemade wheat bread I promised to post on soon.

Wednesday, May 12, 2010

Day Twelve: Pad Thai and Potstickers


Day twelve of Operation: Expand Horizons offered some Asian fare from the minions at Martha Stewart's Everyday Food- Vegetable Pad Thai from May 2010 and Pork and Chive Potstickers from October 2009. I stir-fried some mung bean sprouts as a side dish.

The pad Thai recipe was simple and did not require any hard-to-find ingredients, but as is often the case with recipes from Everyday Food, it tasted quite bland. I wound up adding some Asian chili garlic sauce I had in the fridge to kick it up a notch. Also, the rice noodles I used were not adequately cooked by the soak-and-stir-fry routine of this recipe. I added some additional water and microwaved the serving bowl full of noodles for a minute.

The recipe gives a suggestion to add some thinly sliced chicken breast or peeled shrimp to the skillet before adding the noodles and sauce. Because my husband gets cross-eyed if a dish lacks meat, I sliced up one small breast, salted and peppered it, and cooked it through after sautéing the garlic and onion and before doing the rest.

The pork and chive potstickers were good in flavor, but I have a small disagreement with the way they were cooked. I've made potstickers before from an Alton Brown recipe, and they were awesome. Alton's method is to sauté the dumplings on one side in a very small amount of oil until browned and stuck to the pan (hence the name "potstickers"), then adding a small amount of water and clamping on the lid until the water steams them through and unsticks them from the skillet. They came out nicely browned on one side, and tender and puckered on the other.

Martha's recipe calls for boiling the dumplings first, fishing them out with a slotted spoon, and then cooking them in a small amount of vegetable oil in a nonstick skillet. I'm not sure who forgot over there at Everyday Food, but you can't very well put a wet dumpling into hot oil without having issues. Even with a nonstick skillet, the dumplings did not brown nicely and came out misshapen.

They tasted pretty good, however, and although the dipping sauce is somewhat vinegary (another Everyday Food issue- they have a hard-on for vinegar), it was a good match for the dumplings.

You can get the potstickers recipe at the link above. Because the pad Thai recipe is not yet available online, here it is.

Vegetable Pad Thai
Adapted from Everyday Food Magazine, May 2010
Serves 4

8 oz. dried, wide, and flat rice noodles
2 tbsp. dark brown sugar
2 tbsp. fresh lime juice, plus wedges for serving
3 tbsp. soy sauce
2 tsp. vegetable oil
3 scallions (We call 'em "green onions" here in Oklahoma.), white and green parts separated and thinly sliced
1 garlic clove, minced (I laugh at recipes calling for 1 garlic clove. I used two.)
2 large eggs (optional), lightly beaten (Eggs in Asian food gross me out. I omitted.)
1/2 c. fresh cilantro (My plants are currently going to seed, so I didn't have any.)
1/4 c. chopped roasted, salted peanuts (Baby Chef is allergic, so I omitted.)

Soak rice noodles according to package instructions. Drain. (Mine needed a bit more than soaking. Maybe a soak in hot water instead of cold would do it.)

In a small bowl, whisk together brown sugar, lime juice, and soy sauce. Set aside.

In a large nonstick skillet, heat oil over medium high. Add scallion whites and garlic and cook, stirring constantly, until fragrant, 30 seconds. Add eggs (if using) and cook, scraping skillet with a rubber spatula, until eggs are almost set, about 30 seconds. Transfer egg mixture to a plate.

(This is where I added the sliced seasoned chicken breast and cooked it.)

Add noodles and soy sauce mixture to skillet; cook, tossing constantly, until noodles are soft and coated with sauce, about 1 minute. Add egg mixture and toss to coat, breaking eggs up gently. Serve noodles with lime wedges, topped with cilantro and peanuts.

Tuesday, May 11, 2010

Liquor Cabinet: Pineapple-Cherry Rumtini


Tonight's dinner left me with some extra pineapple chunks and about a cup of juice. I love pineapple juice and have been known to drink it straight from the can, but this evening I decided to booze it up with my husband.

Over ice in a cocktail shaker, I poured the juice from a 20 oz. can of pineapple chunks (almost a full cup) and about 1/3 cup of Bacardi Silver. I shook it up well and strained it into two martini glasses, leaving some extra in the shaker. Then I carefully poured about a jigger of juice from a jar of maraschino cherries into each glass, where it settled at the bottom. I garnished with a cocktail pick of pineapple-cherry-pineapple.

The bottom of the drink was the best. I think the pineapple juice by itself is not quite sweet enough. Also, dark rum would have been a better match. Still, it was pretty to look at and it's not a bad way to use spare juice!

Day Eleven: Pineapple-Stuffed Jerk Chicken with Pineapple Rice


Day eleven of Operation: Expand Horizons was a pair of Martha Stewart recipes-Everyday Food's Pineapple-Stuffed Jerk Chicken, from June 2008, andPineapple Rice, from July/August 2007. I had made the rice before and liked it. I thought it would pair well with the new chicken recipe.

The chicken wasn't our favorite, but it was fun to try something different. There was something about the jerk seasoning we didn't like- probably the allspice. However, I may use the same idea of pineapple stuffing in chicken for another meal, using a honey-soy glaze instead. The pineapple rice recipe is paired with pork kebabs that use this flavor combination, and they are great.

I served fresh green beans on the side. Baby Chef was quite helpful during prep time. She snapped all of the beans by herself!


Day Ten: Red Beans with Andouille Sausage


Day ten of Operation: Expand Horizons brought a simple dish from the minions over at Martha Stewart Omnimedia: Everyday Food's Red Beans with Andouille Sausage. This one is completely idiot-proof, cheap, filling, and weeknight simple.

Recipes from Everyday Food have shown themselves to often be quite bland, so from the start, I made a modification to the recipe. It calls for adding the sausage to the beans after they are cooked- I left it in while the beans simmered to add flavor.

Don't skip the important overnight soak of the dried beans. I'm glad I looked through the soaked and drained beans instead of just dumping them into the pot- there were several dozen "rogue beans" that had not benefited from the soak and looked as though they hadn't been in water at all. I picked them all out. Who wants random hard, undercooked beans ruining the pot of deliciousness?

I served the red beans and sausage over plain white rice, and we had cornbread and iced tea on the side to round out a fine Southern meal.
Properly soaked beans on the left; rogue beans on the right. Remove them and discard.

Day Nine: Mother's Day

Day nine of Operation: Expand Horizons was Mother's Day, and I took a day off from the kitchen. My husband didn't cook, but he got me some delicious lunch from local Mediterranean restaurant Helen of Troy- a gyros and pita wrap with fries and their awesome house-made tzatziki sauce.

For dinner, we had carnitas from local Mexican restaurant La Hacienda. The carnitas are served with corn tortillas, house-made salsa, pico de gallo, and guacamole, lime wedges, rice, and beans. I couldn't think of better food for my Mother's Day!

Day Eight: The day I skipped in favor of cake.


Day eight of Operation: Expand Horizons fell on the day of my cousin's wedding, for which I had been asked to make a groom's cake. I was more than happy to oblige. My daughter was the flower girl as well, so other than decorating cake and getting us dressed, I didn't do much that day.

The groom's cake was two 9 x 13 sheet cakes together, plus the sleeves, which were carved from a 9" square. The cake flavor was chocolate stout, but I substituted coffee for the Guinness the recipe calls for. This is one dense, delicious cake. I iced and decorated it with homemade vanilla buttercream.

The cake recipe is available from this link at Epicurious, and was originally published in Bon Appétit in 2002.


Day Seven: Falafel with Hummus


Day seven of Operation: Expand Horizons offered my first ever vegan meal, and it was singularly delicious. Bon Appétit's Falafel with Hummus was easy, healthy-ish, and super good. The recipe calls for using purchased hummus, but come on! Hummus is easy to do yourself, and I've made it numerous times, so this time was no exception.

For the uninitiated, falafel is a Middle Eastern dish of fried chickpea patties, often served over rice or on pita bread with a drizzle of tahini sauce, which is made from ground sesame seeds. "Oh, wow, delicious," you sarcastically snort. Snort not until you've tried them!

I'd had falafel once before at a local Lebanese restaurant, and they were dry and bland. Knowing how ubiquitous this dish is among Middle Eastern cuisine, I thought that certainly there must be a better version. This recipe is it.

I ate a couple of the falafel patties plain, and made a wrap sandwich with 3 of them using a lavash wrap (a square flatbread that is like a combination of pita and tortilla), a schmear of hummus, cucumber, lettuce, and tomato. Perfect!


Since I was making this for my own lunch, I halved the falafel recipe and used the other half of the can of chickpeas for the hummus. Normally, I use a whole can of chickpeas for hummus. Here's how I make mine.

Hummus
Makes about 2 cups

1 - 15 oz. can chickpeas (garbanzo beans), drained, liquid reserved
2 small cloves garlic, peeled and trimmed of root ends, smashed
extra virgin olive oil
kosher salt and fresh ground pepper
1-2 tbsp. tahini sauce (ground sesame seed paste), to taste
fresh lemon juice from half a lemon, to taste
1 tbsp. Italian (flat leaf) parsley

Place the drained chickpeas, about half of the reserved liquid, garlic cloves, parsley, and tahini in the bowl of a food processor. Drizzle with olive oil, squeeze the lemon half over, and sprinkle with kosher salt and fresh pepper. Process until smooth, scraping the bowl down with a rubber spatula halfway through. Make sure the garlic cloves have not remained whole. If the mixture seems too thick, add more of the reserved chickpea liquid. Taste and adjust seasoning with additional tahini, lemon juice, salt, or olive oil if desired.

Serve as a dip with fresh veggies and pita wedges.


Day Six: Extreme Makeover - Leftovers Edition

While my intention for Operation: Expand Horizons was to have a new recipe every single day of the month, sometimes practicality must rule the day. Day six became Leftover Makeover day, because I had various items in the fridge that needed to be used and I hate to waste food.

The items I had included sautéed red peppers and onions, egg noodles, spaghetti sauce, grilled zucchini and yellow squash, and homemade bread. Since none of this was meat-related, I decided to use it for lunch for myself and our 3 year-old daughter, as my husband is a die-hard carnivore.

Baby Chef's favorite meal in the world is spaghetti, so I decided to go with that theme. She has been a very light eater lately due to allergies and drainage, so I thought I'd sneak extra veg into the sauce. I threw some peppers, onions, zucchini, and spaghetti sauce in the blender and pureed them together. It turns out to be quite tasty that way. She's weird about noodles and insists that spaghetti is not spaghetti unless it's the long skinny kind, so I boiled some of those for her and heated the egg noodles for myself.

I tossed both kinds of noodles with the spiked spaghetti sauce and added more chopped leftover veg to my own bowl. Slices of homemade wheat bread were buttered, sprinkled with garlic salt and shredded mozzarella, and broiled.

I didn't take any photos because none of it was very pretty to look at, but it all tasted fantastic, and it was super quick to put together. Here's a photo of the homemade bread. I'll make a post dedicated to this bread soon, complete with a recipe.


Day Five: Pork and Poblano Tamale Pie


Day five of Operation: Expand Horizons fell on Cinco de Mayo, and it was pure coincidence that I had a Latin-flavored dish on the menu for that evening. Bon Appétit's Pork and Poblano Tamale Pie came out well, with a couple of caveats.

First off, this dish is probably not weeknight fare for most people. It's comprised of a pork and green chile stew that is cooked slowly until the meat is tender, transferred to a cast iron skillet, topped with cheese and cornbread batter, and baked. While it's not difficult to make, it is time consuming, so keep that in mind. However, it was very tasty and worth the wait. This was my first time cooking boneless pork ribs, and I will certainly use them again in other recipes.

My husband was not a fan of the cornbread crust, but said that the filling would be great on its own as pork chile verde. I liked the crust, but thought it was a little too thick in comparison to the height of the stew filling.

I was concerned when first reading the recipe that it might prove too spicy for my sissy husband, but it was just right for him and our 3 year old. I will make the dish again, but as a standalone stew rather than a pie.


Tuesday, May 4, 2010

Day Four: Chicken Cutlets with Asparagus, Capers, and Shallots


Day four of Operation: Expand Horizons was a marginal success. I liked it; my husband called it "edible." Bon Appétit's Chicken Cutlets with Asparagus, Capers, and Shallots may not make it into our regular dinner rotation, but he tried something new and I'm OK with that.

Before plating the food, I wasn't sure how it was going to taste, but I knew that it sure looked pretty.


My normal method of cooking asparagus is steaming, so the broiled kind was new for me and I really liked it. The stalks were not tough at all. The shallots were really good with the chicken, and I was surprised at how mellow the flavor of the fennel seed became during cooking. I'm not normally a big fan of fennel seed or any licorice-type flavors, but it was quite good.

The mustard and caper sauce was really tangy and vinegary, too much so for my husband. I added a teaspoon of sugar and it was better. I knew he might not like it, so I served the sauce on the side.

The sauce called for fresh tarragon, which I have never used and could not find in the grocery store. Not knowing what tarragon tasted like, I took a guess based on the other ingredients and substituted fresh thyme from my garden. It seemed to work.

My oven rack was in the middle position, so broiling time was longer than indicated by the recipe, but that was better for me in that it reduced the chance that the shallots would burn while the chicken stayed raw on the inside.

I made some plain buttered egg noodles to go on the side.

Day Three: Skirt Steak with Crispy Garlic Potatoes


Day three of Operation: Expand Horizons was, unfortunately, a most dismal failure. I chose a recipe that seemed to fit with my husband's tastes, because it was his birthday. Everyday Food's Skirt Steak with Crispy Garlic Potatoes just didn't work out.

The first problem was the skirt steak. It was gamey and tough, and although I grilled it to the recipe's specifications, my husband said it was too rare. The second problem was the crispy garlic potatoes. The recipe did not indicate that the bottoms would brown faster than the tops, and my potatoes wound up overcooked.

The one thing that tasted good was the salad I made. :\

Monday, May 3, 2010

Day Two: Honey-Soy Grilled Pork Chops with Crunchy Bok Choy and Rice


Day two of Operation: Expand Horizons brings us a quick and easy dinner from Martha Stewart's Everyday Food magazine, Honey-Soy Grilled Pork Chops with Bok Choy and Rice.

My husband said the pork chops were good- a high compliment from the man who had previously threatened that I'd better not ruin a good pork chop with some silly glaze. He didn't mind the bok choy, except that some of the stalks were too thick and therefore didn't cook all the way through, and he said they tasted too cabbage-y.

The problem with this is that I had to use regular bok choy instead of baby bok choy as the recipe calls for. My grocery store has carried the babies before but I haven't seen them recently, so I bought a head of regular. We've had it in stir-fry before and liked it, so it wasn't entirely new to us. I tasted the raw bok choy after it was drizzled with sesame oil and salted and peppered, and it was delicious. It would make a great base for an Asian salad or slaw.

He was also not enthused by the rice, which is cooked plain and dressed at the end with rice vinegar and red pepper flakes. Martha's people at EDF seem to have a hard-on for vinegar. It must be an East coast thing.

I'm easy with food, though, and I thought that all in all, it was pretty good. I only made two pork chops, so I had some leftover rice and bok choy that I'll probably use for lunch this week with some other things.

And now, the recipe.

Honey-Soy Grilled Pork Chops with Crunchy Bok Choy
Adapted from Martha Stewart's Everyday Food, June 2008

Serves 4

vegetable oil, for grill grates
1 cup long-grain white rice
2 tbsp. rice vinegar
1/4 tsp. red pepper flakes
coarse salt and ground pepper
2 tbsp. honey
1 tsp. soy sauce
1 tsp. finely grated fresh ginger (I forgot to buy fresh so I used some dried ground ginger and it was fine)
4 bone-in pork rib chops (8 to 10 ounces each)
4 heads baby bok choy, halved lengthwise
1 tbsp. toasted sesame oil

Preheat grill to high; lightly oil grates. (I didn't oil my grill. I usually don't have to.) Cook rice according to package instructions. (I use Uncle Ben's Converted Rice, double the amount of water to the amount of rice, mixing them together before heating over medium to a simmer until done. The rice will have small holes in the surface and will still steam lightly when it's done. Remove from heat and let it sit for 5 minutes.) With a fork, stir in vinegar and red pepper flakes; season with salt. Cover and set aside.

Combine honey, soy sauce, and ginger in a small bowl; season with salt and pepper. Season pork chops with salt and pepper. Grill until opaque throughout, 5 to 7 minutes per side (The thick chops I bought took a little longer.). Brush pork with glaze, and grill 30 seconds more per side. Transfer pork to a plate to rest.

In a bowl, drizzle halved bok choy heads with sesame oil, season with salt and pepper, and toss to coat. Grill until lightly charred on both sides, 1 to 3 minutes. Transfer to plate with chops. Serve chops and bok choy with rice.


Sunday, May 2, 2010

Day One: Best Blueberry Muffins


The first day of Operation: Expand Horizons happened to be the Saturday that we were having my husband's birthday barbecue, so I cheated a little and tried a recipe that was a pretty sure thing. I also did a breakfast item because my day was full of preparations for a houseful of people.

This recipe for Best Blueberry Muffins is from Cook's Illustrated magazine, the folks who bring you America's Test Kitchen. Both Cook's Illustrated and ATK are subscription sites, but I was able to get this recipe a while back when I signed up for a 14-day free trial. Cook's and America's are two of my go-to places for guaranteed good recipes. Alton Brown, Tyler Florence, Bon Appétit, and Martha Stewart are my other reliable sources.

These muffins were fantastic, despite one small blunder on my part. I misread the amount of sour cream and used 1 cup instead of 1 1/4 cups, but they turned out just fine. I gave a few to my friend Allison over at Eat Well, Love Life, and we had the leftovers this morning. They kept well in a zip-top bag.


Best Blueberry Muffins
adapted from Cook's Illustrated

Makes 12 muffins

2 cups all-purpose flour (10 ounces)
1 tbsp. baking powder
1/2 tsp. table salt
1 large egg
1 cup granulated sugar (7 ounces)
4 tbsp. unsalted butter, melted and cooled slightly
1 1/4 cups sour cream (10 ounces)
1 1/2 cups frozen blueberries

Preheat oven to 350º. Spray standard muffin tin with nonstick spray. (I like Pam.)

Whisk flour, baking powder, and salt in a medium bowl until combined and set aside. Whisk egg in a second medium bowl for about 20 seconds. Add sugar and whisk vigorously until thick and homogeneous, about 30 seconds. Add melted butter in 2 or 3 steps, whisking vigorously after each addition. Add sour cream in 2 steps, whisking just to combine.

Add frozen blueberries to flour mixture and gently toss. Add sour cream, sugar, and egg mixture to flour mixture and fold gently with a rubber spatula until batter comes together and berries are evenly distributed. The batter will be very thick. Do not overmix.

Use an ice cream scoop or large spoon to drop batter into greased muffin tin. Bake until light golden brown and a toothpick inserted into the center of a muffin comes out clean, 25 to 30 minutes. Rotate pan halfway through cooking time.

Invert muffins onto a wire rack, stand them upright, and cool 5 minutes. Enjoy!